
 What is stair capping?
Capping stairs with hardwood is a popular and transformative renovation project that can completely change the look and feel of a home. It adds a timeless, elegant aesthetic while also providing durability that stands the test of time. However, capping stairs with hardwood is a detailed process that varies significantly depending on the shape of the treads. From common straight treads to more complex designs like pie-shaped treads and kite winders, each type of tread requires different techniques for manufacturing and installation. In addition, meticulous attention must be paid to managing dust and protecting the home during the project, removing old materials, installing the new hardwood, and perfecting the final finish.
Step 1: Dust Management and Preparation
Before any installation can begin, dust management is a crucial first step in the process. Hardwood stair capping typically involves removing old carpet, cutting existing stair nosings, all of which generate substantial amounts of dust. To minimize this dust from spreading throughout the home, we employ a proactive dust hindrance solution.
We use telescopic poles to hold up plastic sheeting that drapes around the workspace, creating a containment zone. This plastic barrier significantly reduces the amount of dust that can escape into other parts of the home. While it may not provide a completely dust-free solution, it drastically minimizes airborne particles, protecting the rest of the home and ensuring a cleaner work environment.
Step 2: Removing Existing Materials and Cutting Nosings
Once the dust management system is in place, the next step involves removing the old materials from the staircase. This could mean pulling up carpet, removing old stair caps, or cutting back existing stair nosings to prepare the surface for the new hardwood caps. Cutting the nosings is necessary to allow the new hardwood treads to fit flush against the risers, creating a smooth and professional finish. This step requires precision, as improper cutting can affect the appearance and stability of the final installation.
Step 3: Tread Manufacturing Based on Stair Shape
The shape of the stairs will largely dictate the manufacturing process for the hardwood treads. There are several different shapes of treads, each requiring specific techniques for manufacturing and installation.
Straight Treads
“For standard straight treads, the process is more complex than it seems.
Straight treads can’t just be cut to the width of the staircase because stringers are rarely perfectly straight. They can vary by more than 1/4″ from front to back. Additionally, there may be up to a 3-degree difference from the top to the bottom of the tread. In short, it’s not as simple as measuring and cutting—but don’t worry, that’s what we’re here for!”
Kite Winders
For more complex shapes like kite winders (which are formed from two triangular treads with a “kite” or diamond-shaped tread sandwiched between them), templating is essential for accuracy. These irregularly shaped treads need to be precisely cut to fit the staircase, as even the slightest of errors in angles, or measurements can lead to gaps, uneven steps, or other installation issues. Templating involves creating an exact model of the tread shape, which is then used as a guide for cutting the hardwood to fit perfectly.
Pie Shaped Treads
Another common design is the spiral or curved staircase. These “pie shaped” stairs if build correctly will normally only need one template. But on occasion, every step is different, and many templates are needed. That’s where the fun begins!
Bullnose Treads
Another common design is the bullnose tread, typically found on the first step of a staircase. These rounded treads often need to be templated as well, due to their curved edges. The templating process ensures that the curved hardwood pieces fit the contour of the staircase perfectly, giving the first step a smooth and seamless finish.
Step 4: Installing Hardwood Treads and Risers
Once the treads and risers are manufactured and brought to the site, the installation process can begin. The exact installation method can vary depending on the specifics of the project. Sometimes, the hardwood treads and risers are pre-stained and varnished in the workshop before being brought to the site, allowing for quicker installation. Other times, the wood is installed first, and the staining and varnishing are done afterward. Regardless of the order, the installation itself must be done with great care. The treads and risers are meticulously installed, with attention paid to ensuring a perfect fit and alignment. Even the slightest misalignment can lead to uneven steps or gaps between the treads and stringers. Glue and nails are typically used to secure the hardwood in place, providing both stability and durability.
Step 5: Staining and Varnishing
Once the hardwood is installed, the next step is staining and varnishing. If the wood was not pre-finished, it will be stained on-site to the desired color. We always apply stain before painting any risers or stringers to avoid the issue of stain bleeding through painter’s tape, which can result in unsightly marks and imperfections. We take precautions to ensure that the stain is applied evenly and dries consistently, which is crucial for achieving the best final appearance. After staining, two coats of varnish are applied to the hardwood to protect the surface and enhance its beauty. Varnishing is not only about aesthetics; it also provides a durable finish that helps the stairs withstand daily wear and tear. Between coats, the varnish is lightly sanded and buffed to remove any grains that may have raised during the staining process. The varnish is what gives the stairs their final luster and durability, making this a critical part of the process.
Step 6: Painting the Risers and Stringers
Many homeowners opt to paint the risers and stringers white or another light color to contrast against the stained hardwood treads, as well as brighten up the area. Painting is done with meticulous care, especially when it comes to cutting in the edges. Crisp, clean lines are essential for achieving a professional look. Painter’s tape is carefully applied to protect the stained wood while painting, and each coat of paint is applied with precision to avoid drips, uneven coverage, or streaking.
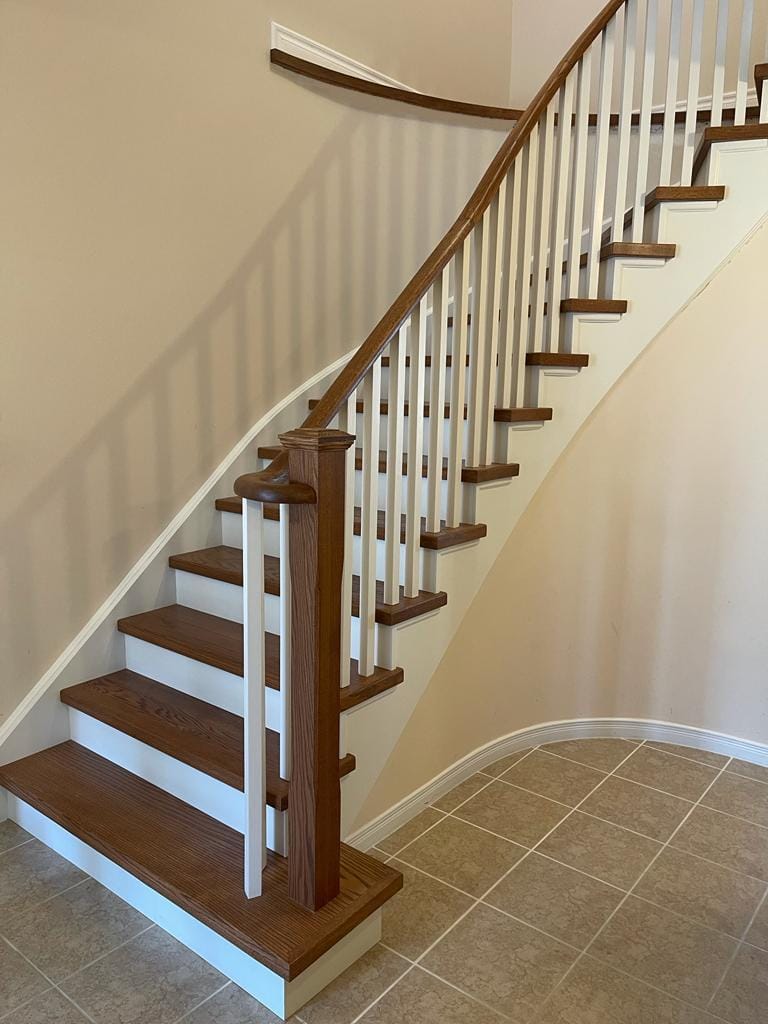
Step 7: Finalizing the Balustrade System
Once the treads and risers are installed, stained, and finished, the focus shifts to the balustrade system, which includes the handrails, spindles, and newel posts. Depending on the staircase design, the balustrade may need to be refinished, painted, or replaced to ensure it complements the newly capped stairs.
In most cases, stair rails manufactured in the GTA after 1980 can be sanded, stained, and varnished to match the treads. However, replacing spindles (or pickets) and newel posts is often necessary. For example, if you’re modernizing your stairs, keeping an older, colonial-style balustrade might not align with your updated design. Creating a cohesive, contemporary look means upgrading the balustrade to match the style of the renovated staircase.
Conclusion
Capping stairs with hardwood is a detailed, multi-step process that requires careful planning and skilled craftsmanship. The process is dictated by the shape of the treads, with more complex shapes like pie treads and kite winders requiring custom templating for accurate cuts. Dust management is essential throughout the project to protect the home and ensure a clean work environment. Once the old materials are removed, new treads and risers are installed with precision, followed by staining, varnishing, and painting. Finally, the balustrade system is addressed to ensure a complete, polished finish. When done correctly, hardwood stair capping can completely transform a staircase, adding beauty, value, and durability to the home.
“Ready to Elevate Your Stairs?
Make your stairs look amazing! Call us now or click the green button below to get your free quote.”
Or hit the below button to check out our stair design tool